Monday, October 17, 2016

What is java try catch

In a running java program an error could occurs at unexpected time. For example, when you are browsing to internet, you post a status or a message, at that time the internet connection is off. The piece of code that running that post task should be aware of this. So, how do the code handle this unexpected error in a running program?. The answer is they use try catch statement in their program.
When this error occurs the code execute the piece of code in catch statement rather than force close the entire running app that will make user annoyed. let's see a piece of code containing a try
catch statement.
package com.example.myapplication;

import android.app.Activity;
import android.os.Bundle;
import android.util.Log;
import android.widget.Button;

public class MainActivity extends Activity {
    private Button button;
    @Override
    protected void onCreate(Bundle savedInstanceState) {
        super.onCreate(savedInstanceState);
        setContentView(R.layout.activity_main);
        try {
            button = (Button) findViewById(R.id.btnLogin);
        }
        catch (Exception e) {
            e.printStackTrace();
            Log.e("Exception raised", e.toString());
        }
        

    }
}

Look at the line 14 to line 20, we have put a try-catch statement here. The purpose of this statement is to anticipate if an exception will be raised inside the try statement, in this example at line 15. This exception will be raised for example if findViewById(R.id.btnLogin) return object not a Button type.
So what happened then if it is not Button type?. The code will immidiately jump to catch statement at line 18. If the exception is not raised, the code at line 18 to 19 will never be executed. Now at line 18 you can put a debug breakpoint to see what makes the cast exception appears. By knowing the cause of the exception, you can fix the code later and minimize the bug in your code.


Thank you for visiting our website. Just comment below if you have any question to ask.

What is java type casting

In android programming with java you will frequently encounter type casting. Since java class can extends another class, this another class can also be casted to its subclass.
Let's see the example code :
package com.example.myapplication.alert;

/**
 * Created by SONY on 17/10/2016.
 */
public class Child extends Father {
    
}

From the code above Child is called a subclass and Father is called a superclass. There is time you need to cast a superclass to its subclass, let's see one example :
 public void createPeople() {
        ArrayList<Father> list = new ArrayList<Father>();
        Father father = new Father();
        Child child = new Child();
        list.add(father);
        list.add(child);
        int size = list.size();
        for(int i = 0; i < size ; i++) {
            Father father1 = list.get(i);
            if(father1 instanceof Child){
                Child child1 = (Child) father1;
            }
        }
    }

Look at line 11, here father1 is type casted to Child, at line 10 we have checked wether father1 is an object instance of Child. so at line 11 now it is safe to cast to its subclass. If we remove line 10, we will not be sure wether father1 is a Child, if not of type Child,  a TypeCastException will be raised. Let's see type casting example in android programming. Look at the activity class code below :
 package com.example.myapplication;

import android.app.Activity;
import android.os.Bundle;
import android.view.View;
import android.widget.Button;

public class MainActivity extends Activity {
    private Button button;
    @Override
    protected void onCreate(Bundle savedInstanceState) {
        super.onCreate(savedInstanceState);
        setContentView(R.layout.activity_main);
        button = (Button) findViewById(R.id.btnLogin);
        button.setOnClickListener(new View.OnClickListener() {
            @Override
            public void onClick(View v) {

            }
        });

    }
}
In android code above, at line 14, findViewById(R.id.btnLogin); return value is a type of View (look at reference here ), but then is casted to type Button. Since Button extends View , see reference  here , this return value of findViewById could be a Button type. But you should make sure that the id R.id.btnLogin  is referring to is the right Button widget in layout xml file. If it does not correctly refer to Button widget in xml layout, a ClassCastException will be raised that will make your app force close.

Thank you for visiting our website. Just comment below if you have any question to ask.

Java Interface and Multiple Inheritance

Interface in java is to support multiple inheritance. What is multiple inheritance? a good question to ask. Multiple inheritance means you inherit property from many individuals. Take yourself as an example, you inherit properties from your mother and your father. A java class also need to inherit properties from other classes. We do this inheritance by extends keyword, it means we extends the class from super class. But extends keyword only valid for one class. for example :
package com.example.myapplication.alert;

/**
 * Created by SONY on 17/10/2016.
 */
public class Child extends Father {
}

It is not valid to extends from two classes like below :
package com.example.myapplication.alert;

/**
 * Created by SONY on 17/10/2016.
 */
public class Child extends Father, Mother {
}

And it is not valid also to write extends two times like below :
package com.example.myapplication.alert;

/**
 * Created by SONY on 17/10/2016.
 */
public class Child extends Father extends Mother {
}

But like in the real world, you need the child inherit properties from mother and father (not just from mother only or father only). Now, I want a child has white skin like his mother and black hair like his father. Okay, that is why we have interface. Let's do that.

Below we define an interface IMother with setSkinWhite() method:
package com.example.myapplication.alert;

/**
 * Created by SONY on 17/10/2016.
 */
public interface IMother {
    public void setSkinWhite();
}


And below we define interface IFather with setHairBlack() method:
package com.example.myapplication.alert;

/**
 * Created by SONY on 17/10/2016.
 */
public interface IFather {
    public void setHairBlack();
}

Now let's make  Child that inherit both IMother and IFather properties.

package com.example.myapplication.alert;

/**
 * Created by SONY on 17/10/2016.
 */
public class Child implements IMother, IFather {
    @Override
    public void setHairBlack() {
        
    }

    @Override
    public void setSkinWhite() {

    }
}


From the above code you see that Child implements both IMother and IFather. So now that child inherits property from his mother and his father. That's it. That is multiple inheritance in java.

Thank you for visiting our website. Just comment below if you have any question to ask.

What is NullPointerException

If you are new to android programming you will frequently encounter with NullPointerException when running your app. NullPointerException will make your running app crash. You will be warned with a dialog app force close.

What is NullPointerException?. From its name we know that it is one of java exception. This exception is raised by Java when you refer to a variable that is null. It means that your variable is not yet initialized, so when you call a method to that variable it does not know where that method is, because that variable itself points to nothing.

Below is an example of NullPointerException in android programming :

package com.example.myapplication;

import android.app.Activity;
import android.os.Bundle;
import android.view.View;
import android.widget.Button;

public class MainActivity extends Activity {
    private Button button;
    @Override
    protected void onCreate(Bundle savedInstanceState) {
        super.onCreate(savedInstanceState);
        setContentView(R.layout.activity_main);
        button.setOnClickListener(new View.OnClickListener() {
            @Override
            public void onClick(View v) {
                
            }
        });


That piece of code above will raise a NullPointerException at line 14, because the variable button is not yet initialized and the method call to button.setOnClickListener does not point to any object at all.
Try to debug at that line by putting a breakpoint at line 14, tutorial to debuggin is here. Point your mouse arrow on button variable, you will see that button variable is still null, then click resume the app will crash.

You can fix that code by initializing button like in the example below :

package com.example.myapplication;

import android.app.Activity;
import android.os.Bundle;
import android.view.View;
import android.widget.Button;

public class MainActivity extends Activity {
    private Button button;
    @Override
    protected void onCreate(Bundle savedInstanceState) {
        super.onCreate(savedInstanceState);
        setContentView(R.layout.activity_main);
        button = (Button) findViewById(R.id.btnLogin);
        button.setOnClickListener(new View.OnClickListener() {
            @Override
            public void onClick(View v) {

            }
        });

    }
}

In the code above button variable has been initialized by findViewById(R.id.btnLogin); and it is safe now to call button.setOnClickListener, no NullPointerException will be raised.

Thank you for visiting our website. Just comment below if you have any question to ask.

What is a java class

A class is a blueprint of object. In java, class is a keyword, you can not use this keyword to name a variable because it is reserved to represent a class.  In  a class you can create other classes, you can create methods, create global variables and etc. Below is an example of a class Student.

package com.example.myapplication.alert;

/**
 * Created by SONY on 17/10/2016.
 */
public class Student {
    private String name;
    
    public String getName() {
        return name;
    }
    public void setName(String name) {
        this.name = name;
    }
}


You can use that class by creating the object class first like in the example below :
 Student student = new Student();
        student.setName("Robert");
        String name = student.getName();


Thank you for visiting our website. Just comment below if you have any question to ask.

Sunday, October 16, 2016

I want to learn android programming from zero

You never do any programming before and you don't study computer science either. But you really want to make an android app. Maybe you are inspired by young people there in the world who have gained a lot of money and become millionaire in their country by making apps or games that luckily becomes so popular. Don't worried. You are in the right place here.

Learning android programming to make apps does not difficult at all. It does not require high math skills unless if you want to invent a new algorithm for search engine. To make you comfort with android programming you just have to change your mindset that everything is object. Yes, Android uses Java and it is one of Object Oriented Programming (OOP). Everything you see or not see in android app is an object. That object also contains other objects. When you click a button, that button is an object. When you see a  page screen that screen is also an object and it contains other objects like button. When you send a message it also create an http object where you can not see.  Even the application itself is an object. So right now look at java codes in android and view it as object. Okay, I think it is clear now and you want to rush to coding.

To start writing code you need to open Android Studio and launch a new project. see :make my first app. After you click next next next and so on, then you finish. Click run button in Android Studio menu and your app will be built, a "hello word" text is shown to you. That is android application. You still don't write any code yet. But the app is there has been created for you by Android Studio. Well well,  At this time you are not supposed to write  any code yet, but you need to understand what has been written to you by android studio. 

When you launch a new project and then click finish at the end the android studio creates some folders and files for the app. The most important file you need to understand is AndroidManifest.xml. 

Below is the example of AndroidManifest.xml

<?xml version="1.0" encoding="utf-8"?>
<manifest xmlns:android="http://schemas.android.com/apk/res/android"
    package="com.example.myapplication">

    <application
        android:allowBackup="true"
        android:icon="@mipmap/ic_launcher"
        android:label="@string/app_name"
        android:supportsRtl="true"
        android:theme="@style/AppTheme">
        <activity android:name="com.example.myapplication.MainActivity">
            <intent-filter>
                <action android:name="android.intent.action.MAIN" />

                <category android:name="android.intent.category.LAUNCHER" />
            </intent-filter>
        </activity>
    </application>

</manifest>


This manifest file tells you a lot information about the application. All of your activity should be registered in this manifest otherwise will not work. The highest hierarchy in manifest is <application> tag. That is your application, it contains activity as the children. When you first install your application from google play store or from apk file or you build from android studio the android system create your application object. Now start thinking that you app is an object. Now click the app icon in home menu screen then it will display a page (page is activity), which activity is displayed first?. Allright,  this manifest will tell you. That the activity that has been declared with intent-filter
as android.intent.category.LAUNCHER will displayed first. Okay now clear to you that why I should see that page. Now let's go back to object thinking. Now when it lauch that activity it creates that activity object, well activity is an object now. Let's see an example of activity code :
package com.example.myapplication;

import android.app.Activity;
import android.os.Bundle;

public class MainActivity extends Activity {

    @Override
    protected void onCreate(Bundle savedInstanceState) {
        super.onCreate(savedInstanceState);
        setContentView(R.layout.activity_main);
        
    }
}

See that MainActivity extends Activity, Activity is a class from Android Library SDK, you don't write it, the google team write it for you, you just extends it. That activity calls onCreate method and set content to your page in  line setContentView(R.layout.activity_main); That is why you see layout activity_main.xml is shown to you. You put activity_main.xml in layout folder under res folder separated from java files, to make easier for you to manage source code. see : explore android studio folders and files. If you have understand this basic concept you are ready for next lessons. keep in mind that everything is object.


Thank you for visiting our website. Just comment below if you have any question to ask.


Android Custom Spinner Item Example

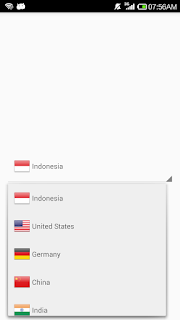
Sometimes you need to display dropdown spinner item with complex item consists not only string text, but with icon beside it. For example a dropdown spinner like the picture below showing a country list and its flag beside it.

Custom spinner showing text and image

Just follow the steps below to make that custom spinner.

1. Make activity layout file activity_spinner.xml

<?xml version="1.0" encoding="utf-8"?>
<RelativeLayout xmlns:android="http://schemas.android.com/apk/res/android"
    android:layout_width="match_parent"
    android:layout_height="match_parent"
    android:padding="12dp">

    <Spinner
        android:id="@+id/spinner"
        android:layout_width="match_parent"
        android:layout_height="wrap_content"
        android:layout_centerInParent="true">

    </Spinner>

</RelativeLayout>
2. Make item layout  file item_country.xml

<?xml version="1.0" encoding="utf-8"?>
<LinearLayout xmlns:android="http://schemas.android.com/apk/res/android"
    android:orientation="horizontal" android:layout_width="match_parent"
    android:layout_height="match_parent"
    android:gravity="center_vertical"
    android:padding="12dp">

    <ImageView
        android:id="@+id/imgFlag"
        android:layout_width="32dp"
        android:layout_height="32dp" />
    <TextView
        android:id="@+id/textCountry"
        android:layout_marginLeft="4dp"
        android:layout_width="0dp"
        android:layout_height="wrap_content"
        android:layout_weight="1"/>

</LinearLayout>
3. Make country class Country.java
package com.example.myapplication.spinner;

/**
 * Created by SONY on 16/10/2016.
 */
public class Country {
    public String name;
    public int flag;
}

4. Make custom spinner adapter class CustomSpinnerAdapter.java
package com.example.myapplication.spinner;

import android.content.Context;
import android.view.LayoutInflater;
import android.view.View;
import android.view.ViewGroup;
import android.widget.ArrayAdapter;
import android.widget.ImageView;
import android.widget.TextView;

import com.example.myapplication.R;

import java.util.List;

/**
 * Created by SONY on 16/10/2016.
 */
public class CustomSpinnerAdapter extends ArrayAdapter<Country> {
    private List<Country> data;
    public CustomSpinnerAdapter(Context context, List<Country> data) {
        super(context, 0, data);
        this.data = data;
    }
    @Override
    public View getDropDownView(int position, View convertView,ViewGroup parent) {
        return getView(position, convertView, parent);
    }
    @Override
    public View getView(int position, View convertView, ViewGroup parent){
        Country country = data.get(position);
        if(convertView == null) {
            convertView = LayoutInflater.from(getContext()).inflate(R.layout.item_country, parent, false);
            convertView.setTag(ViewHolder.createViewHolder(convertView));
        }
        ViewHolder holder = (ViewHolder)convertView.getTag();
        holder.textCountry.setText(country.name);
        holder.imgFlag.setImageResource(country.flag);
        return convertView;
    }
    @Override
    public int getCount( ) {
        return data.size();
    }

    private static class ViewHolder {
        public ImageView imgFlag;
        public TextView textCountry;

        public static ViewHolder createViewHolder(View view) {
            ViewHolder holder = new ViewHolder();
            holder.imgFlag = (ImageView) view.findViewById(R.id.imgFlag);
            holder.textCountry = (TextView)view.findViewById(R.id.textCountry);
            return holder;
        }
    }
}

5. Paste these png images into drawable folder
flag_china.png
flag_germany.png
flag_india.png
flag_indonesia.png
flag_usa.png


6. Make activity class SpinnerActivity.java

package com.example.myapplication.spinner;

import android.app.Activity;
import android.os.Bundle;
import android.view.View;
import android.widget.AdapterView;
import android.widget.Spinner;

import com.example.myapplication.R;

import java.util.ArrayList;
import java.util.List;

/**
 * Created by SONY on 16/10/2016.
 */
public class SpinnerActivity extends Activity {
    private Spinner spinner;
    private CustomSpinnerAdapter spinnerAdapter;
    private List<Country> countries = new ArrayList<Country>();
    @Override
    protected void onCreate(Bundle savedInstanceState) {
        super.onCreate(savedInstanceState);
        setContentView(R.layout.activity_spinner);
        spinner = (Spinner) findViewById(R.id.spinner);
        spinnerAdapter = new CustomSpinnerAdapter(this, countries );
        spinner.setAdapter(spinnerAdapter);

        spinner.setOnItemSelectedListener(new AdapterView.OnItemSelectedListener() {
            @Override
            public void onItemSelected(AdapterView<?> parent, View view, int position, long id) {
                // do something after selected item here
                Country country = countries.get(position);
            }

            @Override
            public void onNothingSelected(AdapterView<?> parent) {

            }
        });
        populateCountries();
    }
    private void populateCountries() {
        Country indonesia = new Country();
        indonesia.name = "Indonesia";
        indonesia.flag = R.drawable.flag_indonesia;
        Country usa = new Country();
        usa.name = "United States";
        usa.flag = R.drawable.flag_usa;
        Country germany = new Country();
        germany.name = "Germany";
        germany.flag = R.drawable.flag_germany;
        Country china = new Country();
        china.name = "China";
        china.flag = R.drawable.flag_china;
        Country india = new Country();
        india.name = "India";
        india.flag = R.drawable.flag_india;
        countries.add(indonesia);
        countries.add(usa);
        countries.add(germany);
        countries.add(china);
        countries.add(india);
        spinnerAdapter.notifyDataSetChanged();
    }
}

7. Make AndroidManifest.xml
<?xml version="1.0" encoding="utf-8"?>
<manifest xmlns:android="http://schemas.android.com/apk/res/android"
    package="com.example.myapplication">

    <application
        android:allowBackup="true"
        android:icon="@mipmap/ic_launcher"
        android:label="@string/app_name"
        android:supportsRtl="true"
        android:theme="@style/AppTheme">
        <activity android:name="com.example.myapplication.spinner.SpinnerActivity">
            <intent-filter>
                <action android:name="android.intent.action.MAIN" />

                <category android:name="android.intent.category.LAUNCHER" />
            </intent-filter>
        </activity>
    </application>

</manifest>
8. Now run the app. You should see a spinner showing country list with name and flag like in the picture above.

 Thank you for visiting our website. Just comment below if you have any question to ask.

Saturday, October 15, 2016

Android Simple Spinner Example

Android spinner is used to display a drop down list to be selected by user. To make android spinner working, just follow these simple steps.


1. Create activity layout activity_spinner.xml
<?xml version="1.0" encoding="utf-8"?>
<RelativeLayout xmlns:android="http://schemas.android.com/apk/res/android"
    android:layout_width="match_parent"
    android:layout_height="match_parent"
    android:padding="12dp">

    <Spinner
        android:id="@+id/spinner"
        android:layout_width="match_parent"
        android:layout_height="wrap_content"
        android:layout_centerInParent="true">

    </Spinner>

</RelativeLayout>
2. Copy and paste array of string below to strings.xml file inside values folder.
<string-array name="month_array">
        <item>January</item>
        <item>Febuary</item>
        <item>March</item>
        <item>April</item>
        <item>May</item>
        <item>June</item>
        <item>July</item>
        <item>August</item>
        <item>September</item>
        <item>October</item>
        <item>November</item>
        <item>December</item>
 </string-array>
3. Make activity class SpinnerActivity.java
package com.example.myapplication.spinner;

import android.app.Activity;
import android.os.Bundle;
import android.view.View;
import android.widget.AdapterView;
import android.widget.ArrayAdapter;
import android.widget.Spinner;

import com.example.myapplication.R;

/**
 * Created by SONY on 16/10/2016.
 */
public class SpinnerActivity extends Activity {
    private Spinner spinner;
    private ArrayAdapter<CharSequence> spinnerAdapter;
    @Override
    protected void onCreate(Bundle savedInstanceState) {
        super.onCreate(savedInstanceState);
        setContentView(R.layout.activity_spinner);
        spinner = (Spinner) findViewById(R.id.spinner);
        spinnerAdapter = ArrayAdapter.createFromResource(this,
                R.array.month_array, android.R.layout.simple_spinner_item);
        spinnerAdapter.setDropDownViewResource(android.R.layout.simple_spinner_dropdown_item);
        spinner.setAdapter(spinnerAdapter);

        spinner.setOnItemSelectedListener(new AdapterView.OnItemSelectedListener() {
            @Override
            public void onItemSelected(AdapterView<?> parent, View view, int position, long id) {
                // do something after selected item here
            }

            @Override
            public void onNothingSelected(AdapterView<?> parent) {

            }
        });
    }
}

4. Make AndroidManifest.xml
<?xml version="1.0" encoding="utf-8"?>
<manifest xmlns:android="http://schemas.android.com/apk/res/android"
    package="com.example.myapplication">

    <application
        android:allowBackup="true"
        android:icon="@mipmap/ic_launcher"
        android:label="@string/app_name"
        android:supportsRtl="true"
        android:theme="@style/AppTheme">
        <activity android:name="com.example.myapplication.spinner.SpinnerActivity">
            <intent-filter>
                <action android:name="android.intent.action.MAIN" />

                <category android:name="android.intent.category.LAUNCHER" />
            </intent-filter>
        </activity>
    </application>

</manifest>
5. After you run the application and click the spinner, it should display the dropdown item like the picture below.


Thank you for visiting our website. Just comment below if you have any question to ask.

Android Gravity Example

When making a layout in android you frequently find xml attribute android:gravity. To understand what is this gravity means, I will give you an example. First look at the layout design in the picture below that is generated by xml without adding android:gravity attribute.

with no android:gravity attribute the layout is put on top.
Now look at the xml code that generate that layout
<?xml version="1.0" encoding="utf-8"?>
<LinearLayout xmlns:android="http://schemas.android.com/apk/res/android"
    android:orientation="horizontal"
    android:layout_width="match_parent"
    android:layout_height="match_parent">

    <Button
        android:layout_width="0dp"
        android:layout_height="wrap_content"
        android:text="Login"
        android:layout_weight="1"/>
    <Button
        android:layout_width="0dp"
        android:layout_height="wrap_content"
        android:text="Signup"
        android:layout_weight="1"/>


</LinearLayout>
Now let's put xml attribute android:gravity="center" inside LinearLayout.
<?xml version="1.0" encoding="utf-8"?>
<LinearLayout xmlns:android="http://schemas.android.com/apk/res/android"
    android:orientation="horizontal"
    android:gravity="center"
    android:layout_width="match_parent"
    android:layout_height="match_parent">

    <Button
        android:layout_width="0dp"
        android:layout_height="wrap_content"
        android:text="Login"
        android:layout_weight="1"/>
    <Button
        android:layout_width="0dp"
        android:layout_height="wrap_content"
        android:text="Signup"
        android:layout_weight="1"/>


</LinearLayout>


Below is the result after we add android:gravity="center" to LinearLayout


From the above picture you can see that android:gravity="center" moves all of LinearLayout's children (Login and Signup button) the center of the screen.

Thank you for visiting our website. Just comment below if you have any question to ask.

Android LinearLayout vs RelativeLayout

In Android development you frequently hear about LinearLayout and RelativeLayout but still confuse what are the differents. Both are different in the way they put the children components inside them.
To give you example about this, let's try to make a login page like in the picture below. Because this login page has many components such as EditText and Button ,  these components can be put inside both LinearLayout and RelativeLayout. Only the technique they use in ordering its components is different between LinearLayout and RelativeLayout.


1. Now let's make that login page using LinearLayout
<?xml version="1.0" encoding="utf-8"?>
<LinearLayout xmlns:android="http://schemas.android.com/apk/res/android"
    android:orientation="vertical" 
    android:layout_width="match_parent"
    android:padding="12dp"
    android:layout_height="match_parent">

    <EditText
        android:layout_width="match_parent"
        android:layout_height="wrap_content"
        android:hint="Email"/>
    <EditText
        android:layout_width="match_parent"
        android:layout_height="wrap_content"
        android:hint="Password"/>
    <Button
        android:layout_width="match_parent"
        android:layout_height="wrap_content"
        android:text="Login"/>

</LinearLayout>
2. Now let's make that login page using RelativeLayout
<?xml version="1.0" encoding="utf-8"?>
<RelativeLayout xmlns:android="http://schemas.android.com/apk/res/android"
    android:layout_width="match_parent"
    android:layout_height="match_parent"
    android:padding="12dp">

    <EditText
        android:id="@+id/editEmail"
        android:layout_width="match_parent"
        android:layout_height="wrap_content"
        android:hint="Email"/>
    <EditText
        android:id="@+id/editPassword"
        android:layout_below="@+id/editEmail"
        android:layout_width="match_parent"
        android:layout_height="wrap_content"
        android:hint="Password"/>
    <Button
        android:layout_width="match_parent"
        android:layout_height="wrap_content"
        android:layout_below="@+id/editPassword"
        android:text="Login"/>

</RelativeLayout>
We can see that in LinearLayout we don't need to specify explicitly that password' EditText should be put below Email's EditText because we have set the orientation as vertical so each component will be put below previous component. But in RelativeLayout we should explicitly tell the password' EditText to be put below Email's EditText by using xml code android:layout_below="@+id/editEmail", if we don't use this xml code the password' EditText will be put on top overlap the Email's EditText. RelativeLayout is more efficient to be used rather than LinearLayout that consumes a lot of performance. But LinearLayout has some advantages in some cases, for example if you need to divide or split a screen in two equally you can use easily with LinearLayout rather than RelativeLayout. For example if you need to make two buttons with equal size that will fill the entire screen horizontally like in the picture below.
Use LinearLayout like this
<?xml version="1.0" encoding="utf-8"?>
<LinearLayout xmlns:android="http://schemas.android.com/apk/res/android"
    android:orientation="horizontal" android:layout_width="match_parent"
    android:layout_height="match_parent">

    <Button
        android:layout_width="0dp"
        android:layout_height="wrap_content"
        android:text="Login"
        android:layout_weight="1"/>
    <Button
        android:layout_width="0dp"
        android:layout_height="wrap_content"
        android:text="Signup"
        android:layout_weight="1"/>


</LinearLayout>
After you run the app, try to rotate your android phone from portrait to landscape. In landscape orientation, the two buttons still in equal size and fill the entire screen horizontally. This is not easy if you use RelativeLayout rather than LinearLayout.

Thank you for visiting our website. Just comment below if you have any question to ask.

Android Alert Dialog Example

In this tutorial I will show you how to generate alert dialog in android. If you follow the steps below you will see that it is very easy to do that. Just follow my example below.

1. Create layout activity xml to host the alert dialog, name it activity_show_alert.xml and put under layout folder.
<?xml version="1.0" encoding="utf-8"?>
<RelativeLayout xmlns:android="http://schemas.android.com/apk/res/android"
    android:layout_width="match_parent" android:layout_height="match_parent">
    <Button
        android:id="@+id/btnShowAlert"
        android:layout_width="wrap_content"
        android:layout_height="wrap_content"
        android:layout_centerInParent="true"
        android:gravity="center"
        android:text="Show Alert"/>

</RelativeLayout>

2. Create activity class, name it ShowAlertActivity.java
package com.example.myapplication.alert;

import android.app.Activity;
import android.app.AlertDialog;
import android.content.DialogInterface;
import android.os.Bundle;
import android.view.View;
import android.widget.Button;

import com.example.myapplication.R;

/**
 * Created by SONY on 15/10/2016.
 */
public class ShowAlertActivity extends Activity {
    private Button btnShowAlert;
    @Override
    protected void onCreate(Bundle savedInstanceState) {
        super.onCreate(savedInstanceState);
        setContentView(R.layout.activity_show_alert);

        btnShowAlert = (Button) findViewById(R.id.btnShowAlert);
        btnShowAlert.setOnClickListener(new View.OnClickListener() {
            @Override
            public void onClick(View v) {
                showAlertDialog();
            }
        });
    }
    private void showAlertDialog() {
        AlertDialog.Builder builder = new AlertDialog.Builder(this);
        builder.setTitle("Choose yes or no");
        builder.setPositiveButton("Yes", new DialogInterface.OnClickListener() {
            @Override
            public void onClick(DialogInterface dialog, int which) {

            }
        });
        builder.setNegativeButton("No", new DialogInterface.OnClickListener() {
            @Override
            public void onClick(DialogInterface dialog, int which) {

            }
        });
        builder.create().show();
    }
}
3. Create AndroidManifest.xml file
<?xml version="1.0" encoding="utf-8"?>
<manifest xmlns:android="http://schemas.android.com/apk/res/android"
    package="com.example.myapplication">

    <application
        android:allowBackup="true"
        android:icon="@mipmap/ic_launcher"
        android:label="@string/app_name"
        android:supportsRtl="true"
        android:theme="@style/AppTheme">
        <activity android:name="com.example.myapplication.alert.ShowAlertActivity">
            <intent-filter>
                <action android:name="android.intent.action.MAIN" />

                <category android:name="android.intent.category.LAUNCHER" />
            </intent-filter>
        </activity>
    </application>

</manifest>
4. Run application it will show page like the picture below.
5. Click show alert button it will display an alert dialog like in the picture below.
Thank you for visiting our website. Just comment below if you have any question to ask.

Friday, October 14, 2016

Android Listview Multiple item type example

If you want to make a listview with different type of item for example to show a list of students with a label header based on their faculty follow these simple steps :


1.  Create a layout activity with name activity_listview.xml
<?xml version="1.0" encoding="utf-8"?>
<ListView xmlns:android="http://schemas.android.com/apk/res/android"
    android:id="@+id/listView"
    android:layout_width="match_parent"
    android:layout_height="match_parent">

</ListView>

2. Insert this png icon into drawable folder. name it ic_picture.png
3. Create item layout to represent a student, name it item_student.xml
 <?xml version="1.0" encoding="utf-8"?>
<LinearLayout xmlns:android="http://schemas.android.com/apk/res/android"
    android:orientation="horizontal" android:layout_width="match_parent"
    android:padding="16dp"
    android:layout_height="match_parent">

    <ImageView
        android:id="@+id/imgStudent"
        android:layout_width="48dp"
        android:layout_height="48dp"
        android:scaleType="centerCrop"/>

    <RelativeLayout
        android:layout_width="0dp"
        android:layout_height="wrap_content"
        android:layout_weight="1">

        <TextView
            android:id="@+id/textName"
            android:layout_width="wrap_content"
            android:layout_height="wrap_content" />
        <TextView
            android:id="@+id/textID"
            android:layout_below="@+id/textName"
            android:layout_width="wrap_content"
            android:layout_height="wrap_content" />

    </RelativeLayout>

</LinearLayout>

4. Create item header layout, name it item_header.xml
<?xml version="1.0" encoding="utf-8"?>
<RelativeLayout xmlns:android="http://schemas.android.com/apk/res/android"
    android:layout_width="match_parent"
    android:layout_height="match_parent"
    android:background="@color/colorPrimary"
    android:padding="12dp">
    <TextView
        android:id="@+id/textHeader"
        android:layout_width="match_parent"
        android:layout_height="wrap_content"
        android:layout_centerInParent="true"
        android:textSize="16sp"
        android:textStyle="bold"
        android:textColor="#ffffff"
        android:gravity="center"/>

</RelativeLayout>
5. Create BaseItem.java class
package com.example.myapplication.customarray;

/**
 * Created by SONY on 15/10/2016.
 */
public class BaseItem {
    
    public int type;
}


6. Create StudentItem.java class that extends BaseItem.java
package com.example.myapplication.customarray;

/**
 * Created by SONY on 14/10/2016.
 */
public class StudentItem extends BaseItem {
    public String name;
    public String id;
    public int picture;

}
7. Create HeaderItem.java class that extends BaseItem.java
package com.example.myapplication.customarray;

/**
 * Created by SONY on 15/10/2016.
 */
public class HeaderItem extends BaseItem {

    public String label;
}

8. Create CustomAdapter.java class
package com.example.myapplication.customarray;

import android.content.Context;
import android.view.LayoutInflater;
import android.view.View;
import android.view.ViewGroup;
import android.widget.ArrayAdapter;
import android.widget.ImageView;
import android.widget.TextView;

import com.example.myapplication.R;
import java.util.List;

/**
 * Created by SONY on 14/10/2016.
 */
public class CustomAdapter extends ArrayAdapter<BaseItem> {

    private List<BaseItem> data;

    public CustomAdapter(Context context, List<BaseItem> data) {
        super(context, 0, data);
        this.data = data;
    }
    @Override
    public View getView(int position, View convertView, ViewGroup parent){
        BaseItem baseItem = data.get(position);
        if(convertView == null) {
            if(baseItem.type == 0) {
                convertView = LayoutInflater.from(getContext()).inflate(R.layout.item_student, parent, false);
                convertView.setTag(ViewHolder.createHolder(convertView));
            }
            else {
                convertView = LayoutInflater.from(getContext()).inflate(R.layout.item_header, parent, false);
                convertView.setTag(ViewHolderHeader.createViewHolder(convertView));
            }
        }
        if(baseItem.type == 0) {
            ViewHolder holder = (ViewHolder) convertView.getTag();
            StudentItem student = (StudentItem) data.get(position);
            holder.textName.setText(student.name);
            holder.textID.setText(student.id);
            holder.imgStudent.setImageResource(student.picture);
        }
        else {
            ViewHolderHeader holderHeader = (ViewHolderHeader) convertView.getTag();
            HeaderItem headerItem = (HeaderItem) data.get(position);
            holderHeader.textLabel.setText(headerItem.label);
        }
       return convertView;
    }

    @Override
    public int getCount( ) {
        return data.size();
    }
    @Override
    public int getViewTypeCount() {
        return 2;
    }
    @Override
    public int getItemViewType(int position) {
        BaseItem item = data.get(position);
        return item.type;
    }


    public static class ViewHolder  {
        public TextView textName;
        public TextView textID;
        public ImageView imgStudent;

        public static final ViewHolder createHolder(View view) {
            ViewHolder holder = new ViewHolder();
            holder.textName = (TextView) view.findViewById(R.id.textName);
            holder.textID = (TextView) view.findViewById(R.id.textID);
            holder.imgStudent = (ImageView) view.findViewById(R.id.imgStudent);
            return holder;
        }
    }
    public static class ViewHolderHeader {
        public TextView textLabel;

        public static final ViewHolderHeader createViewHolder(View view) {
            ViewHolderHeader holderHeader = new ViewHolderHeader();
            holderHeader.textLabel = (TextView)view.findViewById(R.id.textHeader);
            return holderHeader;
        }
    }
}

9. Create CustomActivity.java class
package com.example.myapplication.customarray;

import android.app.Activity;
import android.os.Bundle;
import android.widget.ListView;
import com.example.myapplication.R;
import java.util.ArrayList;


/**
 * Created by SONY on 14/10/2016.
 */
public class CustomActivity extends Activity {
    private ListView listView;
    private CustomAdapter adapter;
    private ArrayList<BaseItem> data = new ArrayList<BaseItem>();
    @Override
    protected void onCreate(Bundle savedInstanceState) {
        super.onCreate(savedInstanceState);
        setContentView(R.layout.activity_listview);
        listView = (ListView) findViewById(R.id.listView);
        adapter = new CustomAdapter(this, data);
        listView.setAdapter(adapter);
        populateListView();
    }

    private void populateListView() {
        HeaderItem headerItem1 = new HeaderItem();
        headerItem1.type = 1;
        headerItem1.label = "Engineering";

        StudentItem student1 = new StudentItem();
        student1.type = 0;
        student1.name = "Muhammad";
        student1.id = "123455";
        student1.picture = R.drawable.ic_picture;

        StudentItem student2 = new StudentItem();
        student2.type = 0;
        student2.name = "Ali";
        student2.id = "123456";
        student2.picture = R.drawable.ic_picture;

        StudentItem student3 = new StudentItem();
        student3.type = 0;
        student3.name = "Rahman";
        student3.id = "123457";
        student3.picture = R.drawable.ic_picture;

        HeaderItem headerItem2 = new HeaderItem();
        headerItem2.type = 1;
        headerItem2.label = "Medicine";

        StudentItem student4 = new StudentItem();
        student4.type = 0;
        student4.name = "David";
        student4.id = "123458";
        student4.picture = R.drawable.ic_picture;

        StudentItem student5 = new StudentItem();
        student5.type = 0;
        student5.name = "Roberts";
        student5.id = "123459";
        student5.picture = R.drawable.ic_picture;

        StudentItem student6 = new StudentItem();
        student6.type = 0;
        student6.name = "Ismail";
        student6.id = "123451";
        student6.picture = R.drawable.ic_picture;
        data.add(headerItem1);
        data.add(student1);
        data.add(student2);
        data.add(student3);
        data.add(headerItem2);
        data.add(student4);
        data.add(student5);
        data.add(student6);
        adapter.notifyDataSetChanged();

    }
}

10. Create AndroidManifest.xml file. Warning: adjust your activity package name in line <activity android:name=<your_activity_package>>. If your package name is not correct the app will crash at run time.
<?xml version="1.0" encoding="utf-8"?>
<manifest xmlns:android="http://schemas.android.com/apk/res/android"
    package="com.example.myapplication">

    <application
        android:allowBackup="true"
        android:icon="@mipmap/ic_launcher"
        android:label="@string/app_name"
        android:supportsRtl="true"
        android:theme="@style/AppTheme">
        <activity android:name=".customarray.CustomActivity">
            <intent-filter>
                <action android:name="android.intent.action.MAIN" />

                <category android:name="android.intent.category.LAUNCHER" />
            </intent-filter>
        </activity>
    </application>

</manifest>
11. After you run your application you should see the screen like this. notice label item is shown now (Engineering and Medicine).
Thank you for visiting our website. Just comment below if you have any question to ask.
Android Listview custom array adapter example

With custom array adapter you can create listview with complex list item not just only string item.
for example if you have to show a list of students with  name, id, and picture. you can use
custom array adapter. Below are the steps to follow :

1. Create an activity layout with name activity_listview.xml
<?xml version="1.0" encoding="utf-8"?>
<ListView xmlns:android="http://schemas.android.com/apk/res/android"
    android:id="@+id/listView"
    android:layout_width="match_parent"
    android:layout_height="match_parent">

</ListView>
2. Create an item layout to show student item with name item_student.xml.
<?xml version="1.0" encoding="utf-8"?>
<LinearLayout xmlns:android="http://schemas.android.com/apk/res/android"
    android:orientation="horizontal" android:layout_width="match_parent"
    android:padding="16dp"
    android:layout_height="match_parent">

    <ImageView
        android:id="@+id/imgStudent"
        android:layout_width="48dp"
        android:layout_height="48dp"
        android:scaleType="centerCrop"/>

    <RelativeLayout
        android:layout_width="0dp"
        android:layout_height="wrap_content"
        android:layout_weight="1">

        <TextView
            android:id="@+id/textName"
            android:layout_width="wrap_content"
            android:layout_height="wrap_content" />
        <TextView
            android:id="@+id/textID"
            android:layout_below="@+id/textName"
            android:layout_width="wrap_content"
            android:layout_height="wrap_content" />

    </RelativeLayout>

</LinearLayout>
3. create a student class with name Student.java
package com.example.myapplication.customarray;

/**
 * Created by SONY on 14/10/2016.
 */
public class Student {
    public String name;
    public String id;
    public int picture;

}
4. Create a custom array adapter class with name CustomAdapter.java
package com.example.myapplication.customarray;

import android.content.Context;
import android.view.LayoutInflater;
import android.view.View;
import android.view.ViewGroup;
import android.widget.ArrayAdapter;
import android.widget.ImageView;
import android.widget.TextView;

import com.example.myapplication.R;
import java.util.List;

/**
 * Created by SONY on 14/10/2016.
 */
public class CustomAdapter extends ArrayAdapter<Student> {

    private List<Student> students;

    public CustomAdapter(Context context, List<Student> students) {
        super(context, 0, students);
        this.students = students;
    }
    @Override
    public View getView(int position, View convertView, ViewGroup parent){
        if(convertView == null) {
            convertView = LayoutInflater.from(getContext()).inflate(R.layout.item_student, parent, false);
            convertView.setTag(ViewHolder.createHolder(convertView));
        }
        ViewHolder holder = (ViewHolder) convertView.getTag();
        Student student = students.get(position);
        holder.textName.setText(student.name);
        holder.textID.setText(student.id);
        holder.imgStudent.setImageResource(student.picture);
       return convertView;
    }

    @Override
    public int getCount( ) {
        return students.size();
    }


    public static class ViewHolder  {
        public TextView textName;
        public TextView textID;
        public ImageView imgStudent;

        public static final ViewHolder createHolder(View view) {
            ViewHolder holder = new ViewHolder();
            holder.textName = (TextView) view.findViewById(R.id.textName);
            holder.textID = (TextView) view.findViewById(R.id.textID);
            holder.imgStudent = (ImageView) view.findViewById(R.id.imgStudent);
            return holder;
        }
    }
}


5. Copy paste the image below to drawable folder with name ic_picture.png
6. Create activity class with name CustomActivity.java
package com.example.myapplication.customarray;

import android.app.Activity;
import android.os.Bundle;
import android.widget.ListView;
import com.example.myapplication.R;
import java.util.ArrayList;


/**
 * Created by SONY on 14/10/2016.
 */
public class CustomActivity extends Activity {
    private ListView listView;
    private CustomAdapter adapter;
    private ArrayList<Student> data = new ArrayList<Student>();
    @Override
    protected void onCreate(Bundle savedInstanceState) {
        super.onCreate(savedInstanceState);
        setContentView(R.layout.activity_listview);
        listView = (ListView) findViewById(R.id.listView);
        adapter = new CustomAdapter(this, data);
        listView.setAdapter(adapter);
        populateListView();
    }

    private void populateListView() {
        Student student1 = new Student();
        student1.name = "Muhammad";
        student1.id = "123455";
        student1.picture = R.drawable.ic_picture;

        Student student2 = new Student();
        student2.name = "Ali";
        student2.id = "123456";
        student2.picture = R.drawable.ic_picture;

        Student student3 = new Student();
        student3.name = "Rahman";
        student3.id = "123457";
        student3.picture = R.drawable.ic_picture;

        Student student4 = new Student();
        student4.name = "David";
        student4.id = "123458";
        student4.picture = R.drawable.ic_picture;

        Student student5 = new Student();
        student5.name = "Roberts";
        student5.id = "123459";
        student5.picture = R.drawable.ic_picture;

        Student student6 = new Student();
        student6.name = "Ismail";
        student6.id = "123451";
        student6.picture = R.drawable.ic_picture;

        data.add(student1);
        data.add(student2);
        data.add(student3);
        data.add(student4);
        data.add(student5);
        data.add(student6);
        adapter.notifyDataSetChanged();

    }
}

6. Create AndroidManifest.xml
<?xml version="1.0" encoding="utf-8"?>
<manifest xmlns:android="http://schemas.android.com/apk/res/android"
    package="com.example.myapplication">

    <application
        android:allowBackup="true"
        android:icon="@mipmap/ic_launcher"
        android:label="@string/app_name"
        android:supportsRtl="true"
        android:theme="@style/AppTheme">
        <activity android:name=".customarray.CustomActivity">
            <intent-filter>
                <action android:name="android.intent.action.MAIN" />

                <category android:name="android.intent.category.LAUNCHER" />
            </intent-filter>
        </activity>
    </application>

</manifest>
7. After you run the app, you should see the result like this.
Thank you for visiting our website. Just comment below if you have any question to ask.

Android Simple Listview Example

In Android ListView is a class to show a list of items that can be scrolled.

To make a ListView is very easy in android. Follow these steps :

1. make an activity layout that contains a ListView. make a layout xml file with name activity_listview.xml like in the example below :

<?xml version="1.0" encoding="utf-8"?>
<ListView 
    xmlns:android="http://schemas.android.com/apk/res/android"
    android:id="@+id/listView"
    android:layout_width="match_parent"
    android:layout_height="match_parent">

</ListView>
2. make a java activity class with name ListViewActivity.java


package com.example.myapplication;

import android.app.Activity;
import android.os.Bundle;
import android.widget.ArrayAdapter;
import android.widget.ListView;

import java.util.ArrayList;

/**
 * Created by SONY on 14/10/2016.
 */
public class ListViewActivity extends Activity {

    private ListView listView;
    private ArrayAdapter<String> adapter;
    private ArrayList<String> data = new ArrayList<String>();

    protected void onCreate(Bundle savedInstanceState) {
        super.onCreate(savedInstanceState);
        setContentView(R.layout.activity_listview);
        listView = (ListView) findViewById(R.id.listView);
        adapter = new ArrayAdapter<String>(this, android.R.layout.simple_list_item_1, data );
        listView.setAdapter(adapter);
        populateListView();
    }
    private void populateListView() {
        data.add("One");
        data.add("Two");
        data.add("Three");
        data.add("Four");
        data.add("Five");
        data.add("Six");
        data.add("Seven");
        data.add("Eight");
        data.add("Nine");
        data.add("Ten");
        data.add("eleven");
        data.add("Twelve");
        adapter.notifyDataSetChanged();}
}
3. edit AndroidManifest.xml like this :
<?xml version="1.0" encoding="utf-8"?>
<manifest xmlns:android="http://schemas.android.com/apk/res/android"
    package="com.example.myapplication">

    <application
        android:allowBackup="true"
        android:icon="@mipmap/ic_launcher"
        android:label="@string/app_name"
        android:supportsRtl="true"
        android:theme="@style/AppTheme">
        <activity android:name=".ListViewActivity">
            <intent-filter>
                <action android:name="android.intent.action.MAIN" />

                <category android:name="android.intent.category.LAUNCHER" />
            </intent-filter>
        </activity>
    </application>

</manifest>


4. Now it is ready to run your application and see result like this picture:

simple listview example


Thank you for visiting our website. Just comment below if you have any question to ask.

How to debug android application tutorial

Debugging is needed by programmer in order to understand what makes an app crashes or why the app behaves unexpectedly. Using Android Studio, every programmer able to debug their code easily.

Below are the steps to debug android code with Android Studio :

1.  Put breakpoint (small red circle)  at the line of code where you want to debug or investigate by clicking at the right of line number. in the example, I put breakpoint at line 22. see the picture below :

Put breakpoint at line of code that you want to debug.
2. Run application in debug mode by clicking debug button at Android Studio Menu bar at the top.

3. after app successfully installed, Just play with your app that will execute the line of code that has the breakpoint. In the example, I should click login button to execute the line of code that has breakpoint.

4. When the app run and want to execute the code at the breakpoint, it will stop before executing that line (line 22).  Click step over like in the picture below to execute that line of code or press F8.

App will stop execute at breakpoint line.
5. When you click step over or F8 the app  execute line 22 and you can investigate variabel intent to know its value by pointing cursor arrow at that variable. You can also investigate parameter View v
that is supplied by onClick method to know its value by pointing cursor arrow at v variable.
The purpose of debugging is to make sure that that line of code contains the right values that you expected. for example if v or intent is null, but you expected not null then that is the problem of error and you need to solve exactly at that line.

6. When you are done investigating the line at the breakpoint, you can resume executing the app by pressing the resume button at the top left of debug console (green triangle button).


Thank you for visiting our website. Just comment below if you have any question.


Thursday, October 13, 2016

When you should call an Activity

There are several places where you need to call an activity:

1. When you touch your app icon in home menu screen you need to call an activity to show the first page of your app ( for example facebook app shows login page). Because this app icon resides in home menu screen(not inside your application) you need to ask a question who is responsible to call this activity or who call this activity that makes it appears?. The answer is the Manifest.xml file handle this. look at the example of manifest.xml code below :
<?xml version="1.0" encoding="utf-8"?>
<manifest xmlns:android="http://schemas.android.com/apk/res/android"
    package="com.example.myapplication">

    <application
        android:allowBackup="true"
        android:icon="@mipmap/ic_launcher"
        android:label="@string/app_name"
        android:supportsRtl="true"
        android:theme="@style/AppTheme">
        <activity android:name=".MainActivity">
            <intent-filter>
                <action android:name="android.intent.action.MAIN" />

                <category android:name="android.intent.category.LAUNCHER" />
            </intent-filter>
        </activity>
    </application>

</manifest>
In the code above notice the line <category android:name="android.intent.category.LAUNCHER" />. This is the line that makes MainActivity is launched first rather than other activities when you click the app icon in home menu screen. It means that MainActivity is launched first not because this manifest contains only one activity but because this LAUNCHER line. You can add more activity in this manifest by putting more tags <activity></activity>. But you should remember that these more activities except the LAUNCHER will never be called (shown to users) unless you call it explicitly in java code, I will give you the example in point 2 below.

 2. You need to call an activity if you want to go from one activity (one page) to another activity (another page). for example in facebook app in login page after you click login button the app will go to home page. At this case you need to call home activity explicitly after the login button click event. this code below show the example:

loginButton.setOnClickListener(new View.OnClickListener() {
            @Override
            public void onClick(View v) {
                Intent intent = new Intent(MainActivity.this, HomeActivity.class);
                startActivity(intent);
            }
        });
Now pay attention to these two lines : Intent intent = new Intent(MainActivity.this, HomeActivity.class); startActivity(intent); This is how you call an activity in java code. intent object specify where or what activity we are right now (in this case MainActivity) and what activity to show next (in this case HomeActivity). the method startActivity(intent); do the actual work to start activity.

Besides these two places you can start activity, there are also several places where you need to start activity for example when you click something in notification drawer,  the technique to start activity uses IntentFilter. I will explain it in later articles.


Thank you for visiting our website. Just comment below if you have any question to ask.

What is Android Activity

Activity in android is a page that hosts content or layout that you design. Activity is a Java class, so it is considered as an object after it has been created.  when you first create android app android studio will recommend you to create an activity (also a layout  file automatically created that will be called inside this activity in java file) where the hellowold text is shown like in first app example make first android app.


Since activity is a java class, it has several methods as regular java classes. the most important method of activity is onCreate that will be called to create the activity. in this onCreate method you set the xml layout that you have created in layout folder (under res folder).

onCreate is the minimum method you should write to make activity show your layout content successfully. below is the source code example to make an activity class.
package com.example.myapplication;

import android.app.Activity;
import android.support.v7.app.AppCompatActivity;
import android.os.Bundle;

public class MainActivity extends Activity {

    @Override
    protected void onCreate(Bundle savedInstanceState) {
        super.onCreate(savedInstanceState);
        setContentView(R.layout.activity_main);
    }
}


In the code above MainActivity is a kind of activity not because its name contains Activity but because it extends Activity class (in java Activity is  called super class, and MainActivity inherits this super class).
when you call setContentView(R.layout.activity_main); , this activity begin to show your layout. in this example the layout activity_main.xml file under layout folder will show.  if you don't call this setContentView then nothing will show at your activity(your activity just show the white blank color).
you should call super super.onCreate(savedInstanceState); because this method will derive all the basic functionality of activity to create activity.


Thank you for visiting our website. Just comment below if you have any question to ask.

Explore Android app project source code folders

When you created the first android app with Android Studio, the system will create automatically several folders and files as the minimum requirements for your app to be build and run successfully.

In the picture below you can see several folders and files created automatically by android studio.


Android App project folders and files


All this folder is very important and crucial to android development. Don't try to delete or rename these folders and files.

All these folders have their own specific purpose to make developer easier in managing the source code.

1. AndroidManifest.xml is the most important file of all. You can edit this file to add activity, service, broadcast receivers, permissions and etc. You specify the first activity (the first page) your app will display in this manifest file. If you call an activity without added to manifest file your app will crash.

2. Java folder is where all the .java files is put under. You edit the java source code to control logic of the application. Since android uses java as the programming langguage what you do in java here is the same as you do with java programming.

3. res is the folder where you put all resources of your application. resources includes images, videos and sounds.  for example images of type .jpg or .png you put in drawable folder. layout folder is used to put all the layout files. layout is made in xml language and you put under layout folder. mipmap is the folder where you put your app icon. this icon will be shown at home screen of android phone after you install on android device. values is the folder where you put all string variables when you use string text to display in your app. values also contains color hex files for you to refer to what color to use in your layout.

4. Gradle Scripts is the folder where you add library to your application. In build.gradle(Module app) you specify the minimum sdk for your app, version code and many other things. if you want to include third party code in you also put the link of the library to this gradle file.


I think that is all you have to know as the basic understanding to make an app in android.


Thank you for visiting our website. Just comment below if you have any question to ask.


Wednesday, October 12, 2016

Run my first android app into a real device

After you create your first android app, you are ready to install or run it into a real device. It is very easy to run your app into a device. Below are the steps to run android app to device :

1. Connect your android phone to your computer through USB port.

2. Make sure that your android device API level is the same or higher than your app minimum SDK API level.

3. Make sure that your Android device's developer options is enabled and USB debugging is enabled.

4. On Android Studio menu bar click button debug or run. After you click  run or debug a dialog showing connected devices will be shown like in the picture below.

Dialog showing connected devices.


5. In this example I connect with  a Xiaomi Phone with API level 18. If the connected device is not displayed try to disconnect and reconnect again. If the connected device still not displayed make sure you have installed the appropriate driver for your phone.


6. Click OK button, the android studio will install the app to your device and show the activity you just created. In this example the "helloworld" text will be displayed.


7. Once the "helloworld" text is displayed it means your app is installed successfully,  now your app icon is shown on home screen of your phone with the name like you first name it at the begining of the project. your next job is to customize the app as you intended to build it.


Thank you for visiting our website. Just comment below if you have any question to ask.

Make my first android app tutorial

To make your first helloworld android app is very easy with Android Studio.

Below are the steps :

1. Open Android Studio.

2. Go to File>>New>>New Project  like in the picture below.

Picture 1 : Go to New Project to make a new android app.


3. After you click New Project, a create new project dialog will appear. like in the picture below fill in the fields in the dialog.

Picture 2 : a create new project dialog


Application Name is the name of your app, you can edit it later.
The company domain is the website of your company for example google.com, you can also change it later.
Project Location is the folder where all your project source code will be stored by android studio.

4. Click next will show a dialog to specify the minimum SDK your app could be installed. In the picture below the app could be installed on Honeycomb device but could not be installed on devices lower than Honeycomb.

Picture 3 : a dialog to specify the minimum SDK your app could be installed.

 
5. Click next will show you a dialog to choose a type of activity your app will first show, it means the first page when you first launch your app after istallation. like in the picture below just choose Empty Activity.

Picture 4 :Choose the type of activity your app will show.


6. Click next will show you a dialog to give the name of the activity, you can change it later during development. Like in the picture below just give MainActivity.

Picture 5 :Edit the name of your activity


7. Click finish, the android studio will create your application. The next step is to run your app in an android device or on an emulator.


Thank you for visiting our website. Just comment below if you have any question to ask.

What is Android Studio

Android studio is an IDE (Integrated Development Environment) developed by Google  for Android platform development. Before Android studio, developers use Eclipse as IDE to develop android applications.

You can download  Android Studio with free at this link: https://developer.android.com/studio/index.html. Its size is around 1.7 GB. Once you have downloaded it you can run and install it step by step easily.
Make sure that before you installed Android Studio you already have JDK (Java Development Kit) installed in your computer. you can download JDK at this link http://www.oracle.com/technetwork/java/javase/downloads/index-jsp-138363.html.

Android Studio display when creating a new project


When you have installed Android Studio and JDK in your machine, you are ready to develop an android application. 

Make sure that you have internet connection when making application with android studio because it uses gradle to build application that you are developing. At first creating an application you don't have to know anything about gradle. It is built automatically by Android Studio.

Below are some features of Android Studio :

1. It uses gradle to build application.
2. Users can quick fix code and refactoring it.
3. Use lint tools to detect performance, usability and version compatibility.
4. It uses ProGuard and has capability for app-signing.
5. It has template based wizards to create designs, layout and many other things.
6. It supports Subversion such as Git.

Thank you for  visiting our website. Just comment below if you have any question to ask.